¸¸,:•:*¨¨*:•:,¸¸,:•:*¨¨*:•:,¸¸,.•*•:*¨¨*:•:,¸¸,:•:*¨¨*:•:,¸¸,.•*•:*¨¨*:•:,¸¸,:•:*¨¨*:•:,¸¸,.•*¨¨*:•:,¸¸,:•:*¨¨*:•:,¸¸,.•*•:*¨¨*:•:,¸¸,:•:*¨¨*:•:,¸¸,.•*•:*¨¨*:•:,¸¸,:•:*¨¨*:•:,¸¸,.•*•:*¨¨*:•:,¸¸,:•:*

Would you wear and use a vintage pocket watch?

Showing posts with label brass. Show all posts

Thursday, May 10, 2012

Forewarned is Forearmed! Steampunk Armor For Sale on Etsy

When you need innovative protection from your enemies (or unhappy friends!), look no further. I have found some most excellent sources for you to purchase fine leather and metal goods created by masterful craftsmen. Some are famous, some perhaps will be quite soon; all certainly have talent!


Dr. Grimmelore Superior Replacement Arm by Thomas Willeford (Lord Featherstone)/Brute Force Studios 

This is indeed the famous armor worn on ABC's "Castle" and also by Lady Clankington in the infamous steampunk poster. Things to know about this item: your order will be custom made in about six months, you can choose a theme, a leather, and a metal, and each arm weighs 10 pounds.


 Combat Tesla Armor Mk II by TheEdmondSteamworks

Things to know about this armor: made of copper, leather, and brass, much of which is bullet casings, and it is for a small or medium-sized person.


Deluxe Steampunk Wings, by Bionic Concepts 
If, gods of wind and cloud forbid, you should need to beat a hasty retreat, these large fantastic mechanized wings will aid your departure.  Things to know about the wings: powered by CO2 cartridges and 8 AA batteries, they have a six foot wingspan, and they are controlled by a hand-held control pad.


Deluxe Aether Fist Armor by Aetheranvil
Things to know about this item: the cuff is 16" by 6", the leather has been well-sealed with wax, and a 9v battery is included to power the disk. The maker also has a video of the disk functioning.


I hope you have enjoyed these selections of personal protection gear. Safety first!

Tuesday, March 6, 2012

How to Make Steampunk Wild West Guns for Under $20 -- Construction of My Rust and Copper Revolvers


The (almost) finished product - steampunk revolver by DreamSteam
     If my readers will indulge me for one more post about steampunk weapons, I will share the saga of how I modified some inexpensive toy guns into some fairly awesome steampunk revolvers. (Spoiler alert: if you would rather not know how utterly plastic-y these looked before, then please do not read further.   They were really, really... orange.)

For those who are still reading, here we go!

It all began with a set of two toy cap guns from the store.  Cost: $10.  (Not shown: The set came with a flimsy vinyl gun belt/holsters, which will most likely be disposed of, since no child would want holsters without guns in them!)

Very raw materials
The base toy cap guns were not much to look at, but I saw potential in them. I also knew I needed to make something to go in my holsters, and fast!  Before going toy shopping, I had already gone through my collection of bits and doodads, so A Plan had already begun to form in my devious mind....


The Plan - Fitting the parts
 Said doodads in action!  Heating the metal bits with a torch and then pressing them into the gun enabled me to melt the plastic, creating divots which would both mark where the parts would go and also ensured a secure final fit for the add-ons.  I removed the removable parts, taped over the brass that I did not want to receive paint and proceeded to make a grand mess with a can of copper spray paint made for plastics (no primer needed... hmmm, we shall see about that). Copper paint: $8.

Silhouette!
(I could not resist photographing one silhouette left on the cardboard after I sprayed the first layer of paint onto the revolvers.)

Base painting and low-lights done.
     After what seemed like dozens of light coats of paint and many hours spread over a few days of letting said paint dry in front of a heater set on low (it was very humid that week, and I was trying to be careful and obtain the "hammered finish" that the paint manufacturer said was possible), I enhanced the raised designs with black paint in the crevasses and let everything dry overnight. Again.

Before gold highlights
     This photo shows one gun before I added gold highlights to the raised design to both.  Since I was fast running out of time, I simply attached the parts I had prepared with E6000 and added a copper coil to the top of the barrel, then used an "aging" technique on the copper to get some nice green patina/crud for a proper steampunk effect.
   But what little parts did I use?  The small parts list (total from both guns): 12 rusty rifle cartridge casings and four tiny shogun shell casings (picked up off the ground at the outdoor gun range), two coils of copper wire, one brass clock gear, two brass bullet casings, 12 amber glass beads (located in the tips of the rusty casings on the sides of the chambers, in case they were too hard to see), two clock parts, two brass pendant bases, two misc silver watch parts (for the rear sights). I had all of these parts "in stock", so they were essentially free.

Ta da!
     And again, here we have the (mostly) finished product.  I had intended to fill the brass plates on the grips with something, like tiny gears and/or some of the pretty Victorianesque paper I had purchased for the purpose.  I also wanted to add contrasting color to the grips, as the guns are a little coppery. My rather hurried attempts at creating a Tesla tribute by wrapping various sections of the guns in copper wire did not turn out to my liking, so I removed the wire and settled for what I had. (The best laid plans.... Sorry, Tesla!)
     So far, the total cost to me for both guns is $19, including a small tube of the glue that I bought for $1, as the larger tubes that I had had dried out.

      I rather think that this was a good effort for my first pair of steampunk-inspired wild west weapons.  I may continue to work on these and try some of my unrealized ideas for them, and if I do, I shall at the very least add another photo here. I shall not make promises, but I fancy trying to make a steampunk gun from scratch.  Already have some of the materials....
     I hope that you have enjoyed reading about how I made my steampunk revolvers, and may it inspire you to give it a try!


Wednesday, January 11, 2012

Brass Wing and Smoky Glass Bead Earrings by DreamSteam

Brass Wings and Smoky Glass Bead Earrings by DreamSteam
It's 2012!  As promised, here are my first pieces of jewelry of the new year.

The faceted glass beads have a pretty smoky quartz color to them.  I really like the stylized, almost art-deco wings that I chose for these earrings, and I am very picky about my wings!

I had to convince myself to post these for sale in my Artfire shop, because I like them so much.  (But if I do not like the things I make, they do not go public, hence I will actually want to keep most of the things that I sell. Catch 22!) 

Two resin rings are in process now; I am using some new materials and have to fidget with them until I am happy with the results. Soon, I hope!

Monday, November 28, 2011

A Bullet Sits Atop It - Copper Watch Face and Bullets Pocket Watch Pendant by DreamSteam


Bullet Pocketwatch Pendant by DreamSteam


Greetings, everyone!

This is the newest piece I have made; it is the first in a series of Wild West steampunk influenced pocket watch pendants that I hope to continue making as long as my supply of pocket watch cases and bullets holds out (I know, I can get more of either).

A vintage pocket watch case forms the base for the piece.  The stamped copper watch face forms the background for some interesting found items, two of which I found at the shooting ranges I frequent: an exquisitely rusted gear, a feathered brass fired bullet casing, and a fired bullet which bounced off of a steel target.  Crystal-clear resin encases all of these items, forming a smooth dome on the front.

As for the photo, I am not finished attempting to photograph this piece (translation: I want a better picture!) and I may or may not sell it with the brass chain seen here, since I want to sell it with something better.  My many ideas for a fancy necklace to enhance the pendant have been eliminated one by one as I have tried them and either they did not work as I had planned, or I just did not like them as well as I thought I would.  The creative process can be a harsh one!

This pendant/necklace will be for sale in my ArtFire studio very soon (hopefully this week), so keep an eye out for it there. (Edit: Done! I have posted this piece for sale, with the brass chain pictured, and posted a better photo of it.)

Monday, June 28, 2010

Wherever the Wind Blows -- Pocket Watch Compass Necklace


Greetings, all!  Over the weekend, I posted my most recent creation for sale in my studio.  I am particularly happy with this piece because I think it has a true steampunk theme and aura.

The detailed cast brass compass rose has some beautiful sky blue enameling at the center which really makes the star 'pop'.  Since sea birds are often regarded as good luck by sailors of the oceans, I wanted to include them in the necklace as well; these two birds-in-flight bring good tidings and some spare brass gears that they found along their journey.  

As for the finish of the metals, I experimented with several metal paints before deciding to remove the coatings ... mostly!  The result was that just the most tenacious bits of two layers of color remained, and after a little bit of sanding and adding some super secret ink in strategic places I got the weathered look that I wanted.

For sale in my ArtFire shop, as usual.  There are several more photographs of the necklace as well as a short narrative about it on my studio page at this location:  
~ DS
(update 7-2-10 -- This necklace has been sold.  Thank you very much!)

Monday, June 21, 2010

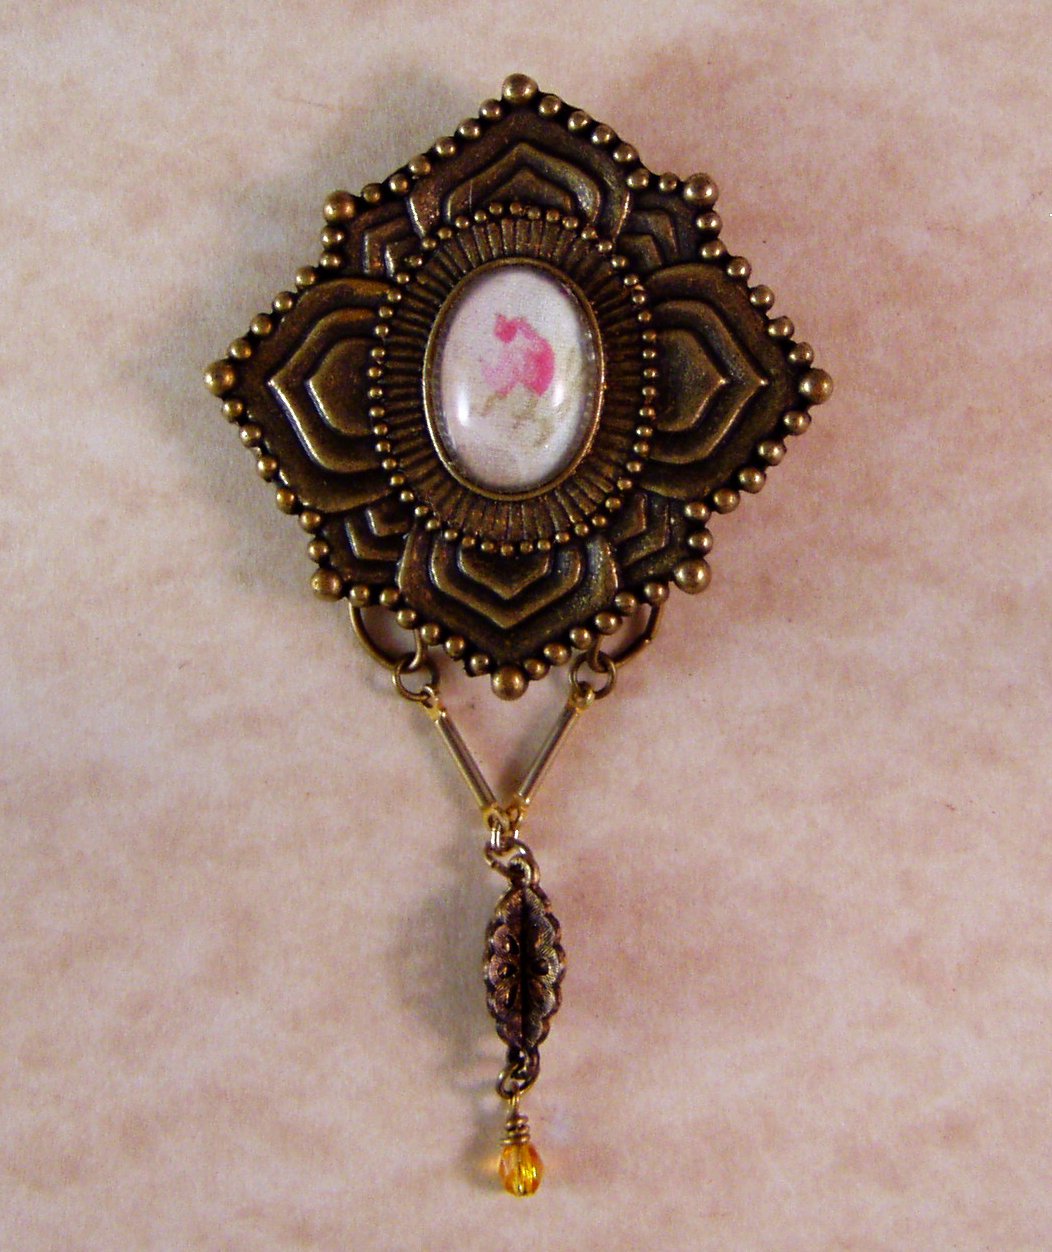
A Tale of Two Roses: Rose Cameo Brass Brooch and Gilded Black Rose Brass Ring


I got a couple of pieces finished over the weekend!  Yay!  It was waaaay too hot to go out and target shoot on Saturday.  Ninety degrees is my limit to be out in all day.  (Okay, so I went to a shoot last weekend and it was 96 that day and I shot very well, but I am trying to learn my lesson!)

The first I will mention is a brass brooch pin with some vintage/antique beads and the image of a gently unfurling rose bud under a glass cabochon.
The technique: Although I had a plan for the oval opening in the center and weeks earlier had ordered glass cabochons to fit there, I eyed the brooch base for a long time, trying to figure out exactly what I wanted to do with it, and then as usual, I just went for it.  The brooch got a little bit of gold leafing to highlight certain spots and give the piece a little shimmer to contrast with the dark antiquing.  The star filigree bead from my grandmother's jewelry collection got a little bit of antiquing to contrast with the brass shimmering.  =p  All in all, I like how if turned out.
(Update 7-2-10 -- This brooch has now been sold.  Thank you!)


The second piece: a gilded, bold black rose on a brass filigree ring.
The technique: I wrapped thin brass wire in a "star" pattern through the center of the filigree section and around the petal-shaped metal base portion to be sure it would remain in place.  A polymer black rose topped it off nicely.  Then I got gold leaf crazy.  It was mostly for fun, and an experiment of how I can secure pieces together with wire rather than glue which makes them much sturdier and thus higher quality, IMO.  If someone likes it enough to purchase it, that's great!

Both of the pieces are for sale in my ArtFire studio, where one may peruse and buy any of my jewelry without signing up for anything.  But if you do sign in to ArtFire, you can leave feedback (they call it Kudos) for my shop once you have received your purchases, which I would appreciate greatly. 

And ... Welcome to my newest blog followers! Thanks to all of you fine ladies and gentlemen for reading my musings.  Please do tell your like-minded friends and family about this and/or my studio.  (Psst... on occasion I will post discount offers for my shop here, available only to those who have discovered this blog.  Gadzooks!)    I hope you enjoy.
~DS

Friday, January 29, 2010

How to "Age" Brass and Copper

A DS original piece created using multiple brass patina and rusting techniques.

In this article, I have summarized some of the more traditional and simple methods of how to give brass (or copper) a vintage-looking patina.  I will use brass as the exemplar metal in the instructions, but most of these techniques will also work on copper.

     There are a couple of basic steps which always apply.

     First of all, make sure that your item is actually brass.  Most aging methods depend on the chemical reaction between the brass metal molecules and the reagent used.  (Introducing a different metal may be dangerous, or at best will not have the desired effect and be a waste of time and materials.)  You can find out by asking an antiques dealer, if needed.

     Second, remove any varnish, oil, or lacquer from the piece, as varnish can be chemically volatile and if your piece has any sealer on it, it will not change color!  Apply acetone, then submerge the piece in boiling water for a short period of time, wipe with a cloth until it seems all of the varnish has been removed, and let dry. (For larger items, apply the acetone, then rub the piece with very hot water on a cloth.)  Alternatively,  sand blasting will also effectively remove any coating on your brass.

     Third, please gather and wear personal protection -- goggles or other protective eye wear and latex/nitrile gloves.  Safety first!

     You will want to keep track of the time it takes for your piece to develop, in case you want to repeat the process someday.

     Now you should be ready to go!  But what method is best to use?  Good question.  Here are a few tried-and-true methods which use easily obtained and economical materials, and some harsher (but quicker) methods.

Salt Water and/or Vinegar

     Use a small brush to "paint" vinegar or a strong salt water solution (1 to 2 tablespoons or more salt per cup of water) on the surface which you desire to age. Let the piece air dry and repeat the process as many times as it takes to get the desired effect.  You also may try immersing your piece in the salt water or vinegar solution and letting it soak.   Cider vinegar or white vinegar will work; commercial-strength ammonia is not necessary but will also do the job.

     Many have suggested that a combination of vinegar and a good measure of salt (a couple of tablespoons per cup vinegar) speeds up the process and gives a more uniform finish.

     Using heat with vinegar gives a rapid result.

To get a "natural" aged brown brass finish with vinegar and heat:
  1.  Pour some vinegar into a plastic container and add a tablespoon or two of salt. 
  2. Mix well.  
  3. Put your pieces in mixture and let them soak for at least a few minutes.
  4. Remove the pieces and dry with paper towel.
  5. Place them on a cookie sheet and put them into a 450 degree oven.
  6. Monitor the change, which should occur in a few minutes.  
  7. Remove the pieces and let cool. 
To get a verdigris (green) patina: 
  1. Soak your pieces in the solution for 1 hour.
  2. Place them on a dark non-greased baking sheet and into a 450 degree oven for 20 minutes.
  3. Take the the hot brass pieces from the oven and place them into the vinegar solution. 
  4. Remove them from the solution in a few minutes or when the desired patina has been achieved. 
  5. Shake them off, carefully! Let air dry.
  6. Use very fine steel wool to polish and create highlights as desired.
 
Ammonia Vapor

     One of the most cited methods for aging brass involves the vapor of ammonia.
For small items, such as jewelry, you may put an ammonia-soaked wad of cotton or cloth in the bottom of a mason jar, then suspend the piece inside the jar lid and seal it up.  The brass should change within 30 minutes.  
  1. For larger pieces, select a container (with a lid) that will hold your item.  
  2. Place a smaller container (preferably glass) inside the bottom of your large container, and fill the smaller container with ammonia.  
  3. Place the brass in the large container so it does not touch the ammonia (liquid ammonia will form spots on the brass).
  4. Seal it tightly.  
  5. Monitor the piece daily and change the liquid ammonia solution every day to maintain potency; if you are environmentally inclined, you can neutralize the used ammonia with baking soda and water before disposing of it.
  6. Remove the brass when you are happy with the finish.
Chemical Methods

-- A mix of Miracle Gro, water and Novacan black patina solution from a stained glass supply can provide a fabulous and quick patina.
-- JAX patina chemicals work amazingly well, and quickly.   These are toxic chemicals, though, so you must read and follow the directions carefully.
-- Liver of sulphur -- add a pinch to warm water.    Degrease and heat the brass, then dip in this solution until you get the look you want.   This is not as toxic as   the two above.
-- Arcrylic Paints and Paint Pens can give you amazing results with some experimentation.  --To enhance the appearance of the piece, you might try products like Rub and Buff, or Renaissance Wax to add some definition to high or low spots.

Natural Methods (linseed oil, time, and...) 

     Don't like using chemicals?  Then you might try one of these methods.

      One is to heat your brass piece in the oven, and then immediately immerse the piece in linseed oil until you see the patina you desire (then remove and wipe dry).  

     The next option involves a leap of ... faith.  And a strong stomach.  Urine contains ammonia. Ruminants (grazing animals) have the highest concentrations of ammonia in their urine due to their plant-based diet.  This method is not very sanitary, of course, and is only mentioned for the sake of thoroughness.
     Soaking in the fluid is one method. (Collecting it is up to the artist!)  You may also try burying the brass piece in a dung/stall scraping pile or even in the kitty litter box for a couple of days (for those of us who are short on livestock).  
     In either case, wash  or sanitize your hands afterward, monitor the item over time and wash it well after it has attained the proper shade of antiquing from using this method. (!)
------
     If none of those natural methods suit you, then you may try rubbing your brass piece with your hands (the oilier the better), and then letting it sit in a location with good air circulation.  A natural patina will form over time (days or weeks).
     Other brass aging methods which also have their proponents include using a generous coating of yogurt, lemon juice, lye (gives a purple, green and dark brown patina), or even gun bluing.

     Whatever method you decide to try, after the brass has the patina you want and has dried thoroughly, a coat or two of varnish or matte lacquer sealant will help maintain the color you worked so hard to achieve.  Otherwise, the patina will continue to develop as the brass is exposed to oxygen in the air.  Remember to seal the front and the back of the piece.

A footnote from a recent experience -- I was using white wine vinegar and salt on a couple of pieces of what I thought was copper; that particular vinegar changed the metal to a green finish within mere minutes.  If I had rinsed the piece when it had reached the desired color, it would have been fine, but after several hours the metal had changed to many odd colors including pink.  I could speculate about the actual metal content of the piece, but on a separate try, I then discovered how to to stop the process and keep the finish.

Sprinkle dry baking soda on it, rinse it carefully, then pat it dry without wiping; this stops the development and once the metal dries, you will still have a nice verdigris on the metal (at least I did) and the acidity will be neutralized.

Enjoy antiquing your metal!
~DS

p.s. - If you want your brass to be a very specific color, check out this scientific site which lists everything you need to do just that: Science Company Patina Formulas for Brass, Bronze, and Copper.

Sunday, December 13, 2009

Stocking Stuffers! Brass and Pearl, Crystal and Gears Steampunk Earrings - Crystal Charm & Mechanical Mata Hari


I was industrious this evening and created a couple of pairs of earrings to post on ArtFire for sale.  The first pair sprang from some pretty dichroic red glass beads and some clear(ish) crackled-glass beads with silver bead caps that I found at the art store last week.  The second pair had been lying on my worktable, unfinished, for a while; the seed pearls I found added the final touch I thought it had been missing (it is VERY difficult to work hardware nuts into a pair of earrings, trust me!).
In a departure from my usual M.O., there are *gasp!* no gears on the second pair! 
I hope someone likes one or both pairs enough to give them homes this holiday season.
You may find them in my ArtFire shop.

~ DS

Wednesday, September 23, 2009

My Precious Clockwork Pendant and Brass Necklace


This fabulous pendant was created by yours truly a few months ago.  I wanted to create something which was larger than my usual pendants, and that had nothing but pure metal on it.  I fit each piece and gear meticulously, changing their configuration a countless number of times until I was satisfied that it looked as if it could function as a true clockwork.  Every piece is from a vintage clock or large pocket watch; all have the beautiful patina that metal receives over many years' time.

This is currently for sale in my ArtFire shop.
You can click and buy it; there is no signing up for anything if you already have a PayPal account.

I value this piece highly because of the sheer number of hours spent perfecting its' design, and the fact that the materials used are rare and possibly even one-of-a-kind in this day and age.
I am fairly certain that absolutely nobody is mass-manufacturing any clock parts of this quality anymore.

Go to DreamSteam's ArtFire Shop to view more pictures, read a more detailed description, and to purchase this wondrous and quality piece of steampunk jewelry art.

~ DS


LinkWithin

Related Posts with Thumbnails